Server Backup
This guide explains how to use Synco to push data from a server to a remote backup destination. Here is an overview:
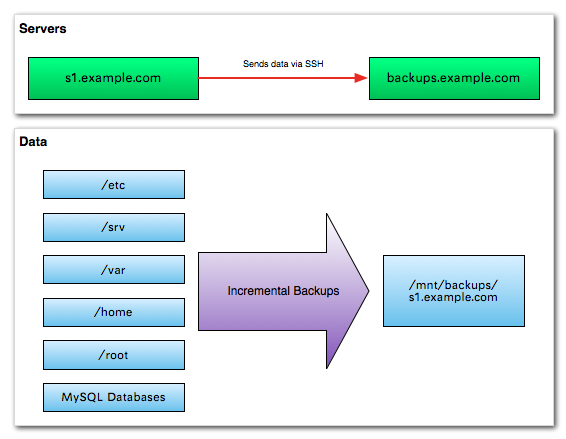
Step 1: Server Setup
We need to make sure the backup source and destinations have all the right software installed, and we also need to create a user on the backup server which will be used for ssh access. These installation instructions should work for Debian/Ubuntu Linux; you may need to use a different package manager on other platforms.
-- On the server (s1.example.com)
$ sudo <span class="function">apt-get</span> <span class="option">install</span> ruby1.8 ruby1.8-dev build-essential rubygems1.8 ssh rsync
... snip ...
$ sudo <span class="function">gem</span> <span class="option">install</span> lsync

-- On the backup (backups.example.com)
$ sudo <span class="function">apt-get</span> <span class="option">install</span> ruby1.8 ruby1.8-dev build-essential rubygems1.8 ssh rsync

-- Create the backup directory (could be anywhere, but I usually put it on an external disk mounted in /mnt)
$ sudo <span class="function">mkdir</span> /mnt/backups/s1.example.com

-- Create an account for the backup user (backups.example.com)
-- If this user already exists, set a password for it using passwd
$ sudo <span class="function">adduser</span> backup
-- Or if already exists
$ sudo <span class="function">passwd</span> backup
Step 2: Enable SSH Access
On the source server (s1.example.com) we need to enable password-less SSH login to the backup server (backups.example.com):
-- Generate a key on the source server (s1.example.com)
$ sudo <span class="function">ssh-keygen</span>

-- Send the public key to the backup server (backups.example.com)
$ cat /root/.ssh/id_rsa.pub | ssh backup@backups.example.com "cat >> ~/.ssh/authorized_keys"
You can test this by checking whether you can log into backup@backups.example.com without having to enter in a password. Make sure you run this test as root, as this is the account on the source server which has the appropriate keys:
-- On the source server (s1.example.com)
$ sudo ssh backup@backups.example.com
-- Expect a successful login without password
$
Step 3: Setting up the backup script
Firstly, we need to setup a directory for the backup scripts.
-- On the source server (s1.example.com)
$ sudo <span class="function">mkdir</span> /etc/lsync
Then, create the following file named /etc/lsync/server-backup.rb. You will need to update references to the various hostnames to suit your exact requirements:
#!/usr/bin/env ruby

require 'rubygems'

require 'lsync'
require 'lsync/shells/ssh'
require 'lsync/methods/rsync'

Synco::run_script do |script|
	script.method = Synco::Methods::RSyncSnapshot.new(:push, :arguments => ["--archive", "--compress", "--stats"])

	script.master = :src

	server(:src) do |server|
		server.host = "s1.example.com"
		server.root = "/"
	end

	server(:dst) do |server|
		server.host = "backups.example.com"
		server.root = "/mnt/backups/s1.example.com/"
		server.shell = Synco::Shells::SSH.new(:user => 'backup')

		server.on(:success) do |controller|
			controller.run ['lsync-rotate', script.method.inprogress_path]
			controller.run ['lsync-prune', '--default-policy']
		end
	end

	backup('etc', 'var', 'srv', 'home', 'root')
end
Step 4: Testing the backup
You can now test the backup to ensure that it is setup correctly.
$ sudo <span class="function">chmod</span> +x /etc/lsync/server-backup.rb
$ sudo /etc/lsync/server-backup.rb
[    INFO] =====================  Backup beginning at Sun Sep 05 13:21:49 +0200 2010  =====================
[    INFO] We are the master server...
[    INFO] Running backups for server s1.example.com:/...
[    INFO] 	    Processing home/ : backups.example.com:/mnt/backups/s1.example.com/
Opening connection to ssh -l "backup" backups.example.com "ruby"
[    INFO] Running: rsync --compress --stats --archive --link-dest "../latest/home/" -e "ssh -l \"backup\"" "/home/" "backups.example.com:\"/mnt/backups/s1.example.com/.inprogress/home/\"" in "/"
[   ERROR] --link-dest arg does not exist: ../latest/home/
-- Snip --
Step 5: Adding MySQL backup
It is generally not advisable to backup the working files of a database server while it is in operation. This is because the database files are constantly in use, and while the database server is running these files may not be in a consistent state. Thus, it is a good policy to dump data to a known plain text format for backup purposes.
Firstly, we need to create an account for dumping the data. You will need to log into MySQL with an account that can create users and grant permissions. Select an appropriate $password:
-- Make up your own password!
CREATE USER "backup"@"localhost" IDENTIFIED BY "$password";

-- Give the backup user access to all databases
GRANT SELECT, SHOW DATABASES, LOCK TABLES ON *.* TO "backup"@"localhost";

-- Update the MySQL daemon with the new permissions
FLUSH PRIVILEGES;
Once this is done, we need to update the /etc/lsync/server-backup.rb backup script:
# Update the :src server :prepare event to dump databases
	server(:src) do |server|
		server.host = "s1.example.com"
		server.root = "/"

		server.on(:prepare) do
			master.run 'mysqldump -u backup --password=$password --all-databases > /var/backups/mysql-dump.sql'
		end
	end
The :prepare event for a server specifies scripts that run before the backup is executed, on either the master or target server. This means that when we run the backup, a copy of the database will be dumped into /var/backups, and this will be copied as part of the regular data backup.
Note, if you are adding sensitive information (in this case, a password for MySQL) to the configuration file, you may want to restrict access to the file. In this case, you should execute $ chmod go= /etc/cron.daily/lsync-backup, and make sure the file is owned by root (or another similar secure account).
Step 6: Integrating with cron
To ensure the backup is running automatically, you can add it into cron. This is fairly simple, simply create a file called /etc/cron.daily/lsync-backup:
#!/usr/bin/env ruby

LSYNC_SCRIPTS = Dir["/etc/lsync/*"]

LSYNC_SCRIPTS.each do |script|
	$stderr.puts "Running #{script}..."
	system(script)
end
Don't forget to $ chmod +x /etc/cron.daily/lsync-backup. Depending on your requirements, you might add this as an hourly job rather than a daily job.
Conclusion
This guide is a simple outline to incrementally backup a server. The basic configuration supplied will prune older backups according to the default policy (see the prune command for more details). This configuration can easily be expanded to backup the data to multiple endpoints, as required, simply by adding additional server clauses.